
Saturday, February 26, 2011

Valentine Monster
Using the pattern for this Valentine Monster on Ravelry, this little guy went to a friend at work.

The rose was made from PlanetJune's Basic Rose free pattern. My friend, Kelly, absolutely loved the gift. Another coworker requested one to give to her daughter, which I also gladly made.

The rose was made from PlanetJune's Basic Rose free pattern. My friend, Kelly, absolutely loved the gift. Another coworker requested one to give to her daughter, which I also gladly made.
Bookmarks
Another couple of projects I completed. The apple bookmark went to my sister Rebecca, in michigan. The teddy bear bookmark went to her daughter Amber.


Hello Kitty!
So I finally finished those belated Christmas presents for my twin sister and her two daughters. I made two of my little birds (free pattern found in this blog) for her, and a Hello Kitty for each of her daughters.


Thursday, February 03, 2011
Explaining my abscense
I recently started a new job, and therefore have little time left to work on my projects. I have completed a few new projects, and hope to have pictures posted soon. I made a scarf to go with my Bella hat, finished the dinosaur for my son (my own pattern, to be posted for free as soon as I figure it out :p), as well as a Valentine Monster holding a Crocheted Rose. I forgot to take a picture of the monster after I made it, before giving it to a friend, but am making another one, which I hope to remember to take a picture of.
In the meantime, things are very much changed for me. Instead of being home all day and taking care of the house, I now leave for work before the kids get on the bus, and get home a few hours after they do. My mother retired from her job, and has taken over the role of caregiver while I'm gone, as well as taking care of the house and meals. It is quite an adjustment, and we are still trying to get used to our new roles.
For now, my new job has me working Monday through Friday, leaving the house at 6:45am, and not getting home until 5:45pm. This is the training period though, and my schedule will soon change. Hopefully I'll be able to have a day off during the week, and not leave until after the kids are on the bus. Although it feels good to be back in the working world, I do miss the time with my children.
In the meantime, things are very much changed for me. Instead of being home all day and taking care of the house, I now leave for work before the kids get on the bus, and get home a few hours after they do. My mother retired from her job, and has taken over the role of caregiver while I'm gone, as well as taking care of the house and meals. It is quite an adjustment, and we are still trying to get used to our new roles.
For now, my new job has me working Monday through Friday, leaving the house at 6:45am, and not getting home until 5:45pm. This is the training period though, and my schedule will soon change. Hopefully I'll be able to have a day off during the week, and not leave until after the kids are on the bus. Although it feels good to be back in the working world, I do miss the time with my children.
Saturday, January 08, 2011
Bic Mark It Color Collection Giveaway
Enter the sweepstakes to win
 The color is long lasting, acid-free, and you can mark on just about any surface from glass, metal, plastic, photo paper, foils, coated, and even oily surfaces. Colors include Petal Pink, Peach Parfait, Summer Melon, Lemon Bliss, Stone Grey, Playful Purple, Hot Aqua, Deep Sea Blue, Woodsy Brown, and For-Ever Green.
If I have a weakness.... it is for pens. I'm drooling over these markers right now. Aren't they so pretty?

If I have a weakness.... it is for pens. I'm drooling over these markers right now. Aren't they so pretty?
Friday, December 17, 2010
SpongeBob - Free Crochet Pattern/Recipe

MATERIALS
Yarn: WW yarn in yellow, dk brown, white, black, and red (tiny amounts of each)
Hook: E
stuffing, yarn needle
HEAD
ch 13 in yellow
Row 1: starting in 2nd ch from hook, sc 12 across, ch1, turn.
Row 2-3: sc 12 across, ch1, turn
Row 4: sc 11 across, sc 2 in last sc
Working down sides of rows, work 3 sc, then 2 sc in corner. Continue working around, on opposite side of foundation chain, work 10 sc across, 2 sc in corner. Work 3 sc across short end, with two sc in corner.
Begin working in rounds
Rnd 1: in BLO, work sc in each sc around (35)
Rnd 2 - 13: sc in each sc around
FO
Add facial details, eyes, eyelashes, nose, smile, etc
EYES
with white:
Rnd 1: 6 sc in magic ring
Rnd 2: 2sc in each sc around
attach to head with black yarn to make pupil and eyelashes.
NOSE
Ch 6
Row 1: sc 5 across, turn
Row 2: work sc into same stitch as previous row (double up your first sc row)
FO by weaving tail through length of nose to beginning tail, and use tail to tie nose onto face.
PANTS
In brown
Rep instructions for head through rnd 4.
FO
JOINING body pieces:
After stuffing both halves, I joined the two pieces with one round of sc. Going in the top edge of the pants, from outside to inside, then on through the top piece from inside to outside, and doing the sc in this manner.
Depending on your preference, you can either begin/end at the center back, to the side, or at the center front (to make an open collar look)
Doing the sc join in this way made the look of a "collar" around the top edge of his shirt, and I really liked the looks of it.
LEGS (make 2)
In black
ch 4, turn, sc 2 across, then 4 sc into last ch to begin a turn and work into opposite side of foundation ch.
sc across bottom of foundation ch with 4 sc in last st.
Mark beginning of rnds if you want, although it's not important.
Here's where the pattern gets a bit "recipe"ish. As I didn't take notes on the legs, since I made these up while in the car waiting for my son to get out of school.
Rnd 1: sc along side of "shoe", and make 2 inc in toe end. sc back around to back of foot.
Rnd 2: sc along side of shoe, and make 2 dec in toe end, sc back around to back of foot.
Rnd 3: sc around, making 2 more dec in toe end of shoe.
change to white, and sc around evenly for 5 rnds.
work 6th rnd of white in BLO
change to Brown
attach yarn to first unworked front loop from last rnd of white.
sc around 3 rnds
Stuff very lightly, or just stuff with extra tails from yarn changes. Fold edges together flat, and attach to front edge of bottom of body through the unworked front loops at the bottom corner edge of the pants.
ARMS (make 2)
in Yellow
ch 14, sl st in 3rd ch from hook, (makes first "finger")
ch 3, sl st in first ch of ch 3, (makes second "finger")
ch 3, sl st in first ch of ch 3, (makes third "finger"), sl st back down length of chain, into "bumps" on bottom of foundation ch.
Attach to body under collar of shirt.
Stitch up a little tie using red yarn, and attach it to front of body under collar of shirt.
I did a simple ch 4, then pulled the yarn through, and wrapped it around the last stitch about 4 times to create a bit of a bulge at the end. I attached it using the tails at the top of the tie, and at the bottom of the tie.
I hope I explained the pattern well enough so that you can make your own SpongeBob buddy if you want to.
This little guy measures about 7" tall from top of head to bottom of foot.
Monday, December 13, 2010
Bella Swan's La Push Hat (edited version)
So I found this great pattern for a hat with cabling that looked awesome. Just as an added bonus, it was a copy of the hat from the Twilight movie that Bella wore.
 With the pattern in mind, I took off to my LYS and found some yarn that I loved. Lion Brand Yarn Jiffy solid in Espresso. I finally started the project late Saturday evening, and made quite a bit of progress before going to bed. I picked it up the next day to work on while watching Eclipse, which my wonderful hubby had just picked up for me. Early Christmas gift that will never make it under the tree.
Trying to concentrate on a pattern using a new technique (fpdc, and bpdc) while watching a new movie is NOT recommended, by the way.
The pattern was fairly simple, 22 rows. After finishing row 17, I was out of yarn. No problem, I had two more skeins, but wait, how does it fit? I tried it on, and looked toward my husband, whom I could no longer see as the hat came way down over my eyes. Yay! this meant I could adjust the pattern to finish out with just one skein instead of using a tiny bit from another one.
So I adjusted the pattern down to be 17 rows total, and moved the ribbing down a few rows here and there to even them out. (Shout-out to the designer, I would be more than happy to share my adjusted pattern so you can offer a one-skein hat) Finally gave up working on it that night, and finished it off this morning while waiting for the school bus to come by. I actually had it completed in time to wear outside while walking my 7yo son to the bus. Loved it! So warm and soft.
Here are a few more pics of me modeling the hat.


If anyone loves this hat enough to make one for themselves, you can find it on Ravelry.com
Bella's Beanie
Happy Crocheting, everyone!

Trying to concentrate on a pattern using a new technique (fpdc, and bpdc) while watching a new movie is NOT recommended, by the way.
The pattern was fairly simple, 22 rows. After finishing row 17, I was out of yarn. No problem, I had two more skeins, but wait, how does it fit? I tried it on, and looked toward my husband, whom I could no longer see as the hat came way down over my eyes. Yay! this meant I could adjust the pattern to finish out with just one skein instead of using a tiny bit from another one.
So I adjusted the pattern down to be 17 rows total, and moved the ribbing down a few rows here and there to even them out. (Shout-out to the designer, I would be more than happy to share my adjusted pattern so you can offer a one-skein hat) Finally gave up working on it that night, and finished it off this morning while waiting for the school bus to come by. I actually had it completed in time to wear outside while walking my 7yo son to the bus. Loved it! So warm and soft.
Here are a few more pics of me modeling the hat.


If anyone loves this hat enough to make one for themselves, you can find it on Ravelry.com
Bella's Beanie
Happy Crocheting, everyone!
Sunday, December 12, 2010
Mini Stuffed Football - Free Crochet Pattern

Materials:
WW yarn in dk brown and white, or team colors of your coice.
Hook E
Stuffing (either polyfil or strips of fabric for extra weight)
Abbreviations:
INC = Increase
DEC = Decrease
sc = single crochet
rnd = Round
Special Instructions: Repeat instructions between * *
Increase by working 2 single crochet in same stitch.
Decrease by inserting hook into front loop on stitch, draw up a loop, insert hook into front loop of next stitch, draw up a loop, yarn over and draw through all three loops on hook.
Lacing: worked with one strand of white yarn, draw yarn through starting point and leave a long tail running the length of where you will work. make each stitch crossing the tail twice before moving to the next stitch. Tuck both tails to the inside when finished, and tie together to secure.
Notes: this is worked in a continuous spiral, do not join rounds.
Pattern:
Rnd 1: 8 sc in magic circle (8)
Rnd 2: INC in each sc around (16)
Rnd 3: sc in each sc around (16)
Rnd 4: *sc in next 3 sc, INC* around (20)
Rnd 5: sc in each sc around (20)
Rnd 6: *sc in next 4 sc, INC* around (24)
Rnd 7: *sc in next 3 sc, INC* around (30)
Change color to white
Rnd 8: *sc in next 4 sc, INC* around (36)
Rnd 9: sc in each sc around (36)
Change color back to brown
Rnd 10: *sc in next 11 sc, INC* around (39)
Rnd 11: sc in each sc around (39)
Rnd 12: *sc in next 12 sc, INC* around (42)
Rnd 13: sc in each sc around (42)
Rnd 14: *sc in next 13 sc, INC* around (45)
Rnd 15: sc in each sc around (45)
Rnd 16: *sc in next 14 sc, INC* around (48)
Rnd 17: sc in each sc around (48)
Rnd 18: *sc in next 15 sc, INC* around (51)
Rnd 19 - 20: sc in each sc around (51)
Rnd 21: *sc in next 15 sc, DEC* around (48)
Rnd 22: sc in each sc around (48)
Rnd 23: *sc in next 14 sc, DEC* around (45)
Rnd 24: sc in each sc around (45)
Rnd 25: *sc in next 13 sc, DEC* around (42)
Rnd 26: sc in each sc around (42)
Rnd 27: *sc in next 12 sc, DEC* around (39)
Rnd 28: sc in each sc around (39)
Rnd 29: *sc in next 11 sc, DEC* around (36)
Change color to white
Rnd 30: sc in each sc around (36)
Rnd 31: *sc in next 4 sc, DEC* around (30)
Change color to brown
Rnd 32: *sc in next 3 sc, DEC* around (24)
Rnd 33: *sc in next 4 sc, DEC* around (20)
Stitch laces on body of football, first cross lace beginning 3 rounds from white stripe, last cross lace ending 3 rounds from other white stripe, with 8 laces total. Stuff
Rnd 34: sc in each sc around (20)
Rnd 35: *sc in next 3 sc, DEC* around (16)
Rnd 36: sc in each sc around (16)
Stuff a little more
Rnd 37: *DEC* around (8)
Stuff a little more if possible.
Weave tail through last 8 stitches and pull to close. FO
I used about 2 of my husband's old socks, cut into strips to stuff my football, It's a bit heftier than if I'd used regular polyfil.


Saturday, December 11, 2010
A Little Birdie - Free Crochet Pattern

A Little Birdie
Materials: Red Heart Super Saver yarn in Country Blue and Pale Yellow (or colors of your own choice).
Hook: E
Stuffing
Black yarn, small safety eyes, or floss for eyes
Finished size: About 4 1/2" tall
Abbreviations:
ch = chain
sc = single crochet
INC = Increase (work 2 single crochets in same stitch)
DEC = Decrease (insert hook in front loop of stitch, draw up a loop, insert hook in front loop of next stitch, draw up a loop. Yarn over and draw through all 3 loops on hook)
st = stitch
rnd(s) = Round(s)
slst = slip stitch
FLO = front loops only
BLO = back loops only
BEAK (in yellow)
ch 4
Row 1: sc in 2nd st from hook, DEC, ch 1, turn
Row 2: DEC, slst, pull yarn through, pull to tighten the st, then weave in tail. Use beginning tail to attach to head.
HEAD (in blue)
Rnd 1: 6sc in magic circle
Rnd 2: INC in each sc around (12)
Rnd 3: *sc in next sc, INC* around (18)
Rnd 4: *sc in next 2 sc, INC* around (24)
Rnd 5-8: sc in each sc around
Rnd 9: *sc in next 2 sc, DEC* around (18)
Attach beak between rnds 6 & 7
Attach eyes appropiately depending on what you are using.
Rnd 10: *sc, DEC* around (12)
Rnd 11: sc in each sc around
Rnd 12: *sc in next sc, INC* around (18)
Stuff head
Rnd 13: *sc in next 2 sc, INC* around (24)
Rnd 14: *sc in next 3 sc, INC* around (30)
Rnd 15-19: sc in each sc around
Rnd 20: *sc in next 3 sc, DEC* around (24)
Rnd 21: *sc in next sc, DEC* around (16)
Rnd 22: *sc in next sc, DEC* 5 times, sc (11)
Stuff body
Rnd 23: DEC 5 or 6 times, until hole is small enough to close off. Finish stuffing body, weave tail through remaining stitches, and pull to tighten and close. Weave in tail.
FOOT (make 2) (in yellow)
Rnd 1: ch 2, 6 sc in 1st ch.
Rnd 2: INC in first sc, INC in next sc, sc, ch 1, turn
No longer working in rnds.
Row 1: Make Bobble*, slst to next sc, ch 1, make Bobble, slst to next sc, ch 1, make Bobble, slst in same st, pull yarn through and tighten. Weave end in.
Use beginning tail to attach to bottom of body.
*Make Bobble: wrap yarn over hook, insert hook into st and draw up a loop, yarn over, and pull through 2 loops on hook. wrap yarn over hook, insert hook into same st and draw up a loop, yarn over, and pull through 2 loops on hook. Wrap yarn over hook, and pull through all 3 loops on hook.
LEFT WING (in blue)
Row 1: Ch 8, sc in 2nd ch from hook, and in each st across. Ch 1, turn
Row 2: In BLO, sc 6, ch 1, turn.
Row 3: In FLO, slst 2 times, then sc 4 times. Ch 1, turn
Row 4: In BLO, sc 4, ch 1, turn
Row 5: In FLO, slst across to end of row, ch 1.
Row 6: working down sides of rows, work the following:
sc, (hdc, dc), (dc, hdc), sc
FO and attach to body.
RIGHT WING (in blue)
Row 1: Ch 8, sc in 2nd ch from hook, and in each st across. Ch 1, turn
Row 2: In FLO, sc 6, ch 1, turn.
Row 3: In BLO, slst 2 times, then sc 4 times. Ch 1, turn
Row 4: In FLO, sc 4, ch 1, turn
Row 5: In BLO, slst across to end of row, ch 1.
Row 6: working down sides of rows, work the following:
sc, (hdc, dc), (dc, hdc), sc
FO and attach to body.
TAIL (in blue)
Row 1: Ch 6, starting in 2nd ch from hok, work 5 sc across. (One tail feather made)
Row 2: Repeat Row 1 (Second tail feather made)
Row 3: Repeat Row 1 (Third tail feather made)
Row 4: Turn so "feathers" are hanging down, you will be working across the ends of these rows.
Ch 1, sc in first ch of third feather row
sc in first ch of second feather row
sc in first ch of first feather row, ch 1, turn
Row 5: sc across 3 sts. Ch 1, turn
Row 6: sc across 3 sts. FO & attach to back of body between rnds 18 & 19


Tuesday, December 07, 2010
Getting Behind
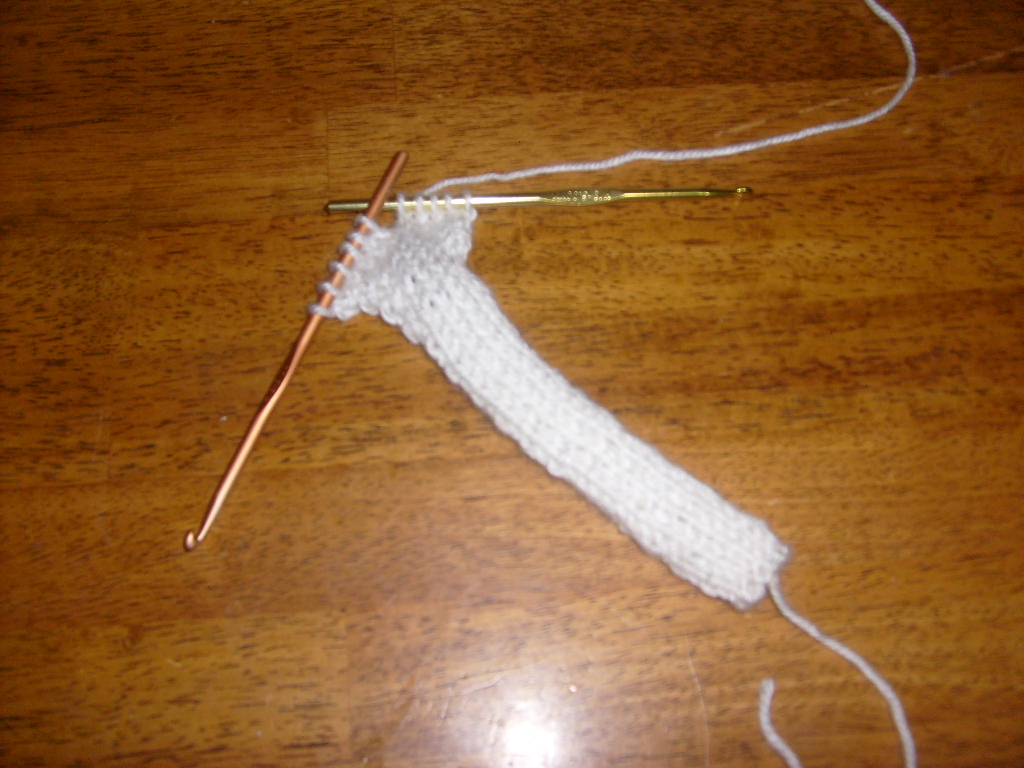
Still working on projects for Christmas. And I just taught myself how to knit. I don't have any knitting needles though. One of the little projects I was doing had the pattern for a tiny knit scarf, so I decided to use the wrong ends of two H hooks. Knitting is fun!

I know, I probably just made knitters cringe in horror, but don't worry, I plan on getting myself some knitting needles very soon. :)
I have a job interview today, so I might have less time to spend on my crafts if all goes well at the interview. But less time for crafting evens out with more money to spend on yarn, and supplies. :D
I've completed 3 small projects for my nephews. Still have my niece, another nephew, and my son to finish up. Plus two other nieces if I can find the time. I've got a lot to do!
I know, I probably just made knitters cringe in horror, but don't worry, I plan on getting myself some knitting needles very soon. :)
I have a job interview today, so I might have less time to spend on my crafts if all goes well at the interview. But less time for crafting evens out with more money to spend on yarn, and supplies. :D
I've completed 3 small projects for my nephews. Still have my niece, another nephew, and my son to finish up. Plus two other nieces if I can find the time. I've got a lot to do!
Thursday, December 02, 2010
Fuzzy Kitty - Free Pattern
Made up this pattern for my daughter, because she wanted a kitty cat, and the yarn I wanted to use wasn't compatible with any pattern I found already available, so I made it up as I went along. I jotted down notes so I could share the pattern. ;)
 Materials:
Yarn: Yarn Bee Soft Illusion Super Bulky
Hook: I/9 (5.50mm)
Safety Eyes/Nose (or button, or floss to embroider)
Fiberfill or other stuffing
HEAD
Rnd 1: 6 sc in magic circle
Rnd 2: 2 sc in each sc around (12)
Rnd 3: 1 sc in next sc, 2sc in next sc around (18)
Rnd 4: 1 sc in next 2 sc, 2sc in next sc around (24)
Rnd 5: 1 sc in next 3 sc, 2sc in next sc around (30)
Rnd 6-11: sc in each sc around
Rnd 12: 1 sc in next 3 sc, dec around (24)
Rnd 13: 1 sc in next 2 sc, dec around (18)
Rnd 14: 1 sc in next sc, dec around (12)
At this point, attach eyes/nose, add facial features. Stuff head
Rnd 15-16: sc in each sc around
Continue for BODY
Rnd 17: 1 sc in next sc, 2sc in next sc around (18)
Rnd 18: 1 sc in next 2 sc, 2sc in next sc around (24)
Rnd 19-23: sc in each sc around
Rnd 24: 1 sc in next 5 sc, 2 sc in next sc around (28)
Rnd 25-26: sc in each sc around
Rnd 27: 1 sc in next 5 sc, dec around (24)
Rnd 28: 1 sc in next 2 sc, dec around (18)
Rnd 29: 1 sc in next sc, dec around (12)
Stuff body
Rnd 30: dec around (6)
Stuff body, close opening.
LEGS & ARMS (make 4)
Rnd 1: 4 sc in magic circle
Rnd 2: 2 sc in each sc around (8)
Rnd 3: 1 sc in next sc, 2 sc in next sc around (12)
Rnd 4-5: sc in each sc around
Rnd 6: 1 sc in next sc, dec around (8)
Stuff paw
Rnd 7-18: sc in each sc around
TAIL
Rnd 1: 4 sc in magic circle
Rnd 2: 2 sc in each sc around (8)
Rnd 3-24: sc in each sc around
EARS (make 2)
Ch 5
Sc in 2nd ch from hook
(hdc, dc, tr) in next ch
(dc, hdc) in next ch
(sc, sl st) in last ch
Pull yarn through on last sl st, cut long tail for joining ear to head.
Assembly:
Attach arms, legs, and tail in same manner.
Press open edges at top together and sew through both thicknesses to attach to body.
Attach ears to head, leaving a slight curve at bottom of ear.


Yarn: Yarn Bee Soft Illusion Super Bulky
Hook: I/9 (5.50mm)
Safety Eyes/Nose (or button, or floss to embroider)
Fiberfill or other stuffing
HEAD
Rnd 1: 6 sc in magic circle
Rnd 2: 2 sc in each sc around (12)
Rnd 3: 1 sc in next sc, 2sc in next sc around (18)
Rnd 4: 1 sc in next 2 sc, 2sc in next sc around (24)
Rnd 5: 1 sc in next 3 sc, 2sc in next sc around (30)
Rnd 6-11: sc in each sc around
Rnd 12: 1 sc in next 3 sc, dec around (24)
Rnd 13: 1 sc in next 2 sc, dec around (18)
Rnd 14: 1 sc in next sc, dec around (12)
At this point, attach eyes/nose, add facial features. Stuff head
Rnd 15-16: sc in each sc around
Continue for BODY
Rnd 17: 1 sc in next sc, 2sc in next sc around (18)
Rnd 18: 1 sc in next 2 sc, 2sc in next sc around (24)
Rnd 19-23: sc in each sc around
Rnd 24: 1 sc in next 5 sc, 2 sc in next sc around (28)
Rnd 25-26: sc in each sc around
Rnd 27: 1 sc in next 5 sc, dec around (24)
Rnd 28: 1 sc in next 2 sc, dec around (18)
Rnd 29: 1 sc in next sc, dec around (12)
Stuff body
Rnd 30: dec around (6)
Stuff body, close opening.
LEGS & ARMS (make 4)
Rnd 1: 4 sc in magic circle
Rnd 2: 2 sc in each sc around (8)
Rnd 3: 1 sc in next sc, 2 sc in next sc around (12)
Rnd 4-5: sc in each sc around
Rnd 6: 1 sc in next sc, dec around (8)
Stuff paw
Rnd 7-18: sc in each sc around
TAIL
Rnd 1: 4 sc in magic circle
Rnd 2: 2 sc in each sc around (8)
Rnd 3-24: sc in each sc around
EARS (make 2)
Ch 5
Sc in 2nd ch from hook
(hdc, dc, tr) in next ch
(dc, hdc) in next ch
(sc, sl st) in last ch
Pull yarn through on last sl st, cut long tail for joining ear to head.
Assembly:
Attach arms, legs, and tail in same manner.
Press open edges at top together and sew through both thicknesses to attach to body.
Attach ears to head, leaving a slight curve at bottom of ear.


Sunday, November 14, 2010
Book Tote with Free Pattern

Book Tote with Free Pattern
Materials: Red Heart Super Saver Solids - 1 7oz skein of Frosty Green (F) and 1 7oz skein of Medium Thyme (M)
Hook Size: G
Gauge: 5sc = 1" and 6 rnds = 1"
Finished Size: 14" wide, 5 1/4" deep, 10" tall with 16" strap to center point from top edge of bag.
Optional: Cardboard cut to 14" x 5 1/4"
Abbreviations:
rnd = round
ch = chain
sc = single crochet
hdc = half double crochet
dc = double crochet
BLO = back loops only
FO = Fasten off (usually join with slip stitch to next stitch, pull up a tail and cut, then weave tail into work)
Bag Pattern
Wtih M, ch 61
Row 1: sc in 2nd ch from hook
Row 2: sc in each sc across, ch-1, turn
Rep row 2 for a total of 22 rows, but work 2sc in last st of last row. DO NOT TURN but begin working in rnds.
Rnd 1: sc across short end (20 sc) with 2sc in last st. Continue working sc in each sc across long edge, with 2sc in last sc for corner. sc across short end. Do Not Join.
Rnd 2: Working in BLO for this round only, sc in each sc around
Rnd 3 - 12: sc in each sc around
Rnd 13: Change color to F, sc in each sc around
Rnd 14 - 22: sc in each sc around
Rnd 23: (Do not chain), but begin working hdc in each sc around
Rnd 24: hdc in each hdc around
Rnd 25: (Do not chain), but begin working dc in each hdc around
Rnd 26 - 32: dc in each dc around
Rnd 33: hdc in each dc around
Rnd 34: hdc in each hdc around
Rnd 35: sc in each hdc around
Rnd 36 - 40: sc in each sc around
Rnd 41: Change color to M, sc in each sc around
Rnd 42: sc in each sc around, FO, weave in ends
Straps pattern:
With M, ch 441, or until about 58" long
Row 1: starting in 2nd ch from hook, sc in each ch across, ch-1, turn
Row 2: sc in each sc across, ch-3, turn
Row 3: dc in each sc across, ch-1, turn
Row 4: sc in each sc across, ch-1, turn
Row 5: sc in each sc across, FO
Finishing:
Join long strap together at short ends to make a large circle, being careful not to twist.
Place seam at bottom of bag about 15 st from short edge of bottom. Stitch strap into place along bottom and up sides of bag.
With this side attached, find the center point on the opposite side of the "strap circle" and attach to opposite side of the bottom of the bag, the same as the first side of the strap. (see photos for placement clarification).
Optional: Cut a thick piece of cardboard to the same measurements of the bottom of the bag and place inside bottom of bag for more strength to bottom.


If you encounter any problems with this pattern, please let me know.
This pattern should be able to be easily adjusted for a larger or smaller bag, and with longer or shorter straps. Feel free to play with it to make a bag of your own liking.
Sunday, October 31, 2010
Happy Halloween!
So hubby had to work, and got home too late to go with us, so I arranged to meet up with some friend and family to go together. First we went to the parade in town. There were some very good costumes out there!


 After the parade, we met up and piled on the hayride and went around the neighborhood to all the houses.
When all was said and done, my kids had raked in over 6 lbs of candy.


When all was said and done, my kids had raked in over 6 lbs of candy.


Tuesday, October 26, 2010
Storm passing through
So I woke up this morning, and went to log on the internet, check my email, facebook, etc, etc. And all of a sudden, I notice that the wind outside is blowing really strong. Wow, we might finally be getting some rain. So I check our local news channel on the web, and find out we are under a Tornado Watch.
Okay, I don't know about you, but I am absolutely TERRIFIED of storms. So here I am, sitting at the computer with 3 tabs on showing different weather aspects, pacing around the house looking out of every window, watching the radar and trying to calculate when the main body of the storm is going to hit us... I realize that I tend to go a little overboard when storms pass through. Turns out, all we got out of it was some strong wind gusts, and tiny sprinkling of rain. No Lightning. No Tornadoes. Here my stomach is tied in KNOTS, and nothing happens. My husband laughs at me for being paranoid.... my sister (who I call on the phone), giggles at my paranoia while trying to show some sympathy.
I'm thinking the holiday trip will be cancelled. My sister won't be coming down for Thanksgiving after all, because we won't have a house if a tornado rips through it. I'll have to call my mom to see if she can come home early because the house is gone.

LOL. Yeah, I'm one of those people. But so far so good. Looks like it is clearing out. Good thing, too, because we plan on driving to Jackson today, which is a good 2 hours away, in a car that has bald tires, and a bad wobble. So I'm not looking forward to that. :p
So needless to say, my house didn't blow away, the holiday trip won't be cancelled, and I don't have to call my mom home from the boat...
Still, I don't like storms, never have, and most likely never will. Unless I'm in a securely fortified stone/brick bunker that has no chance of ever being uprooted by wind/rain or other natural disasters. And seeing as how we can't afford anything like that... Yeah, I just pray that it's not storming the day I finally die. Because that would suck.
Okay, I don't know about you, but I am absolutely TERRIFIED of storms. So here I am, sitting at the computer with 3 tabs on showing different weather aspects, pacing around the house looking out of every window, watching the radar and trying to calculate when the main body of the storm is going to hit us... I realize that I tend to go a little overboard when storms pass through. Turns out, all we got out of it was some strong wind gusts, and tiny sprinkling of rain. No Lightning. No Tornadoes. Here my stomach is tied in KNOTS, and nothing happens. My husband laughs at me for being paranoid.... my sister (who I call on the phone), giggles at my paranoia while trying to show some sympathy.
I'm thinking the holiday trip will be cancelled. My sister won't be coming down for Thanksgiving after all, because we won't have a house if a tornado rips through it. I'll have to call my mom to see if she can come home early because the house is gone.

LOL. Yeah, I'm one of those people. But so far so good. Looks like it is clearing out. Good thing, too, because we plan on driving to Jackson today, which is a good 2 hours away, in a car that has bald tires, and a bad wobble. So I'm not looking forward to that. :p
So needless to say, my house didn't blow away, the holiday trip won't be cancelled, and I don't have to call my mom home from the boat...
Still, I don't like storms, never have, and most likely never will. Unless I'm in a securely fortified stone/brick bunker that has no chance of ever being uprooted by wind/rain or other natural disasters. And seeing as how we can't afford anything like that... Yeah, I just pray that it's not storming the day I finally die. Because that would suck.
Sunday, October 24, 2010
"Nutty Buddies" Amigurumi Acorns with Oak Leaf

My husband said they would look better with a leaf to go with them, so I came up with my own pattern. Check earlier blog posts for the Oak Leaf pattern.
I'm making 7 sets of these as gifts for Christmas, and I have 3 done, 4 more to go. All I need to do to finish the last 4 at this point, is sewing on eyes, mouth, attaching the "cap", and putting it all together. So it shouldn't take long to finish these up.
Bookmark for nephew

I changed the "open" filet to closed, and the "closed" to open, because I liked the look of it better, and also because I don't like all the open spots. I'm still thinking about blocking this one, and making it stiffer to be better as a bookmark, but again, this is for a tweenager ;)
Thursday, October 21, 2010
Oak Leaf with Free Pattern

I came up with this pattern after a few failed attempts, when I couldn't find a pattern for a leaf that I liked.
I like the curl that runs through it, instead of it being just a flat leaf.
As always, I tend to use whatever yarn I have on hand, and these don't use much at all. I made these using a G Hook.
Gauge: Not important.
Abbreviations:
ch = chain
sc = single crochet
st = stitch
lp = loop
sl st = slip stitch
tc = treble crochet
Piece will curl as you
Oak Leaf Ch 20, turn
Row 1: Starting in second st from hook, sc in next 4 st, ch 2, then
Row 2:
Row 3: repeat row 1. FO, weave in ends or use to tie to another piece.
If you like this pattern, want to try it yourself, or have problems with it, please leave a comment.
Pumpkin Pouches - with Free Pattern

I made these at the request of my sister, Angelia. I think they turned out rather well, and they also gave me some ideas for other patterns I want to try. These are very simple drawstring bags, and I'm sharing the pattern here. Keep in mind, that I tend to work with basic Red Heart yarn bought at Wal-Mart, and I like working with the G hook. But these patterns are very forgivable, so just grab your favorite yarn and hook, because the gauge really isn't important here.
Note: piece is worked in rounds, no joining.
This pattern should be easily adjusted if you want a smaller or larger bag.
| Pumpkin Pouch Begin with a "magic ring", adjustable ring. Ch 1 | |
| Rnd 1: sc 6 times into ring. | (6 st) |
| Rnd 2: 2 sc in each sc around. | (12 st) |
| Rnd 3: 2 sc in each sc around. | (24 st) |
| Rnd 4: *1 sc in next st, 2 sc in next st* repeat between * 12 times. | (36 st) |
| Rnd 5: *1 sc in next 8 st, 2 sc in next st* repeat between * 4 times. | (40 st) |
| Rnd 6-23: sc in each sc around. | (40 st) |
| Rnd 24: *1 sc in next 4 st, ch 1, sk st* repeat between * 8 times. | (40 st) |
| Rnd 25 & 26: sc in each st around. FO and weave in ends. | (40 st) |
ch 65 or about 15 inches long.
If you like this pattern, want to try it, or have questions, please let me know.
Wednesday, October 06, 2010
Painting the Kitchen
So I've decided that I want to redo my kitchen from a pink/blue/tan country flower type decor, to one more to my liking. Keeping in mind that the countertops are a pale blue, I had to work that into my new theme.
So I decided to go with this country bear that I have some potholders and towels for.

So the tan cabinets and blue countertops that are currently in the kitchen will work well with this new theme. However, there is some red in there that I wanted to bring out. So I decided to paint the "backsplash" a nice dark red color. Here's hoping it will turn out ok.
The following pictures are of the same corner of the kitchen, of different stages of my painting project today.

Here is the previous wallpaper that was in the kitchen. It was a light cream background with the pink and blue flowers all over it. Fine for my mother, but not so much for me.
 Here is the same corner, after I moved things out of the way and peeled the paper off. It was contact paper, which is different from normal paper, being sticky on the back out of the wrapper. It pulled off fairly easily.
Next I went around with a steel scrubber and roughened up the paint that was there, trying to smooth it out. Then I went over it with a wet cloth to remove the dust I'd created. Next I took masking tape and taped off around the kitchen above and below where I wanted to paint.


 First coat of paint, second coat of paint, outlet covers replaced. I think it turned out great!
So I decided to go with this country bear that I have some potholders and towels for.

So the tan cabinets and blue countertops that are currently in the kitchen will work well with this new theme. However, there is some red in there that I wanted to bring out. So I decided to paint the "backsplash" a nice dark red color. Here's hoping it will turn out ok.
The following pictures are of the same corner of the kitchen, of different stages of my painting project today.

Here is the previous wallpaper that was in the kitchen. It was a light cream background with the pink and blue flowers all over it. Fine for my mother, but not so much for me.

Next I went around with a steel scrubber and roughened up the paint that was there, trying to smooth it out. Then I went over it with a wet cloth to remove the dust I'd created. Next I took masking tape and taped off around the kitchen above and below where I wanted to paint.


Subscribe to:
Posts (Atom)


 Posts
Posts


